Check your laptop user manual to find out how to activate the external video output. From Philips
Damage can result from improper handling.1 General safety informationTake note of all warning and safety notes indicated. Not only will your voice be heard, but you can: 1999 - 2022 HSN, Inc. All Rights Reserved.

Projection Distance Coverage (Metre): 2- Min. Enjoy a pleasant picture, all the connection options you need and, thanks to the USB media player, experience a versatile projector that is convincing both at first sight and in everyday use thanks to its workmanship and modern appearance.
philips neopix This symbol indicates tips that will help you in using this product more effectively and easily. See our price match guarantee. The LED on the projector blinks during upgrade.Wait about 15 seconds. You can access the following playback functions.
neopix easy2 This is the most common way to position the projector for quick setup and portability.To adjust projection to the correct position, press , and go to SETUP Panel Flip Rotate.Front ceilingMount the projector on the ceiling with upside up in front of the projection screen. Use a soft brush or lens cleaning paper for cleaning the lens of the projector. This is the most common way to position the projector for quick setup and portability. The information contained herein is designed only for use with this product. DANGER!1.11
projection neopix 
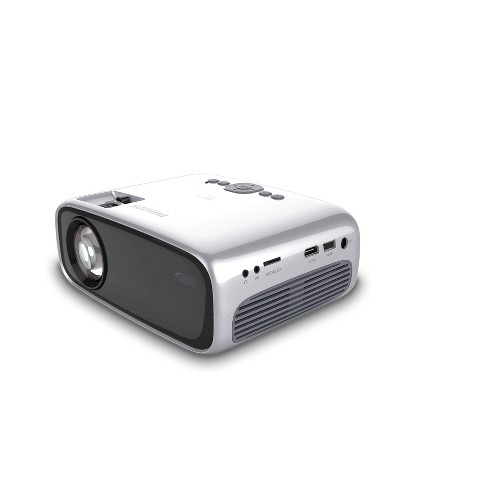
An improper ceiling installation may result in accident, injury or damage. on NeoPix Easy Mini Projector NPX440 User Manual, Register your product and get support at www.philips.com/support, Connecting to external speakers or headphones. All rights reserved. Up to 80" viewable screen size that allows everyone in the room to enjoy a clear view. Restore default settings1.43 Incorrect operation, and improper handling can lead to physical injury, damage to the product or loss of data.if(typeof ez_ad_units!='undefined'){ez_ad_units.push([[300,250],'manuals_plus-leader-2','ezslot_7',117,'0','0'])};if(typeof __ez_fad_position!='undefined'){__ez_fad_position('div-gpt-ad-manuals_plus-leader-2-0')};if(typeof ez_ad_units!='undefined'){ez_ad_units.push([[300,250],'manuals_plus-leader-2','ezslot_8',117,'0','1'])};if(typeof __ez_fad_position!='undefined'){__ez_fad_position('div-gpt-ad-manuals_plus-leader-2-0_1')};if(typeof ez_ad_units!='undefined'){ez_ad_units.push([[300,250],'manuals_plus-leader-2','ezslot_9',117,'0','2'])};if(typeof __ez_fad_position!='undefined'){__ez_fad_position('div-gpt-ad-manuals_plus-leader-2-0_2')};.leader-2-multi-117{border:none!important;display:block!important;float:none!important;line-height:0;margin-bottom:2px!important;margin-left:0!important;margin-right:0!important;margin-top:2px!important;max-width:100%!important;min-height:250px;min-width:300px;padding:0;text-align:center!important}Setting up the productThis product is for indoor use only. The product must be repaired by an authorised service centre.Please find the details of authorised service centres on the warranty card supplied with this product.Do not remove the type label from this product, as this will void the warranty.if(typeof ez_ad_units!='undefined'){ez_ad_units.push([[970,250],'manuals_plus-leader-1','ezslot_13',560,'0','0'])};if(typeof __ez_fad_position!='undefined'){__ez_fad_position('div-gpt-ad-manuals_plus-leader-1-0')};Power supplyUse only a power adapter which is certified for this product (see Technical data, page 17). Never place heavy or sharp objects on the product or on the power cable.If the product gets too hot or emits smoke, shut it down immediately and unplug the power cable. Take note of all warning and safety notes indicated. Danger of hearing damage!Before connecting the headphones, turn down the volume on the projector.Do not use the projector over a longer time at high volume especially when using headphones. Computers, electronics and more to keep up to date with the latest technology. Do not use any liquid cleaning agents!Do not use any liquid cleaning agents for cleaning the lens, to avoid damaging the coating film on the lens. Select User to customize the following settings: Contrast: Set color contrast. Brightness: Set color brightness. Color: Set color saturation. Sharpness: Set image sharpness. Color Temperature: Set different color temperature. Aspect Ratio: Set a screen ratio. Noise Reduction: Set a noise reduction level.Sound settingsPress .Select SETUP, and then press OK to access the setting options.Select a sound option, and then press / to change: Sound Mode: Select pre-defined sound settings for your video or music. The grade refers only to the aesthetic appearance of the product. Receive exclusive offers and news that will brighten up your day! Its based on the preparation time, the delivery service selected on the Shopping Basket page and when we receive cleared payment. Electric toothbrush refills & accessories. Changing screen size1.26 Easily adjust the picture for the best viewing angle with manual focus and angle correction.

WIN 1 of 3 framed posters signed by ROBBIE WILLIAMS! Physical characteristics / Size / Color / Measurements Do not spray the projector with any cleaning fluids.Wipe over the surfaces gently. To help avoid possible injuries to persons or damage to the product itself, position all cables in such a way that no one will trip over them.Do not operate the product in damp rooms. Projection Distance (Meter): 0,8 General:- Width (mm): 150- Height (mm): 84,5- Depth (mm): 150- Weight (kg): 0,86 Plug in the included portable 15 Bluetooth speaker or tr, With the , cinema-quality imaging is at your fingertips. Enjoy smart-TV functionality on the big screen with the LG CineBeam HU85LA HDR XPR 4K UHD Ultra-Short Throw Laser DLP Home Theater Projector. Wait about 15 seconds.
neopix projector int joyces $60.00 w/Flexpay, Quantity
To correct keystone or distorted images to be rectangular or square, turn the keystone knob on the top of the projector. ). $20 off your first order with code HSN2022. PHOTO: Activate photo media player to access and play photo files. Simply use the HSN Return Label within 30 days of receipt to return your item for a free replacement of the same item in a different color or size.
neopix 80inch Do not place the product in the vicinity of heaters or air conditioners. The packing materials should be kept out of the hands of children.For your own safety, do not use the product during thunderstorms with lightning.RepairsDo not repair the product yourself. To adjust projection to the correct position, press , and go to SETUP Panel Flip Rotate. The miniature device uses every popular media option in todays market, boasting onboard Wi-Fi, Bluetooth, mobile-to-screen mirroring, USB and HDMI hookups for comprehensive compatibility. Leaking batteries can possibly damage the remote control.Never expose the remote control to direct sunlight.Avoid deforming, dismantling or charging the batteries.Avoid exposure to open fire and water.Replace empty batteries immediately.Remove the batteries from the remote control if not in use for long periods of time.Open the battery compartment.Insert the supplied batteries (type AAA) with correct polarity (+/-) indicated.Close the battery compartment.When using the remote control, point the remote control at the IR sensor on the projector, and make sure there is no obstacle between the remote control and the IR sensor.if(typeof ez_ad_units!='undefined'){ez_ad_units.push([[970,250],'manuals_plus-netboard-1','ezslot_25',714,'0','0'])};if(typeof __ez_fad_position!='undefined'){__ez_fad_position('div-gpt-ad-manuals_plus-netboard-1-0')};Power on and setupPress to turn on the projector. a DVD player, gaming console, camcorder or digital camera) to the projector through AV connection.
neopix idealo
Have the product inspected by an authorised service centre.Always handle the product with care. Do not turn off the projector or remove the USB flash drive during the update. When using the remote control, point the remote control at the IR sensor on the projector, and make sure there is no obstacle between the remote control and the IR sensor. JavaScript enables you to fully navigate and make a purchase on our site. This product complies with the voltage type specified on the product.The power outlet shall be installed near the product and shall be easily accessible. Place the product securely on a stable, flat surface. Connect a playback device (e.g. Remote control to easily browse and stream content.
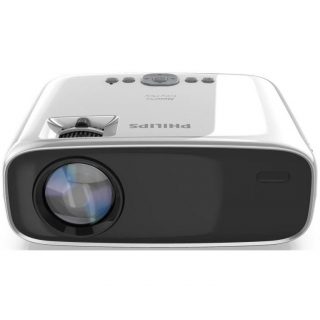
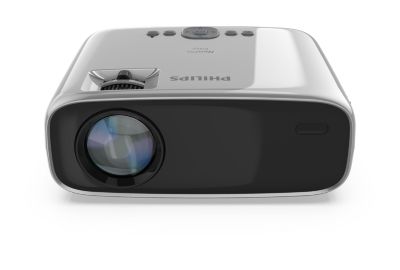
At the collection points made available to you locally (drop-off centre, selective collection, etc. Access the settings menu. Access the home menu. Access input source list.if(typeof ez_ad_units!='undefined'){ez_ad_units.push([[336,280],'manuals_plus-mobile-leaderboard-1','ezslot_21',702,'0','0'])};if(typeof __ez_fad_position!='undefined'){__ez_fad_position('div-gpt-ad-manuals_plus-mobile-leaderboard-1-0')};Front viewProjection lensFront IR sensorSide view 3.5 mm audio output; connect to external speakers or headphones.AV3.5 mm audio/video input; connect to the analogue audio jacks and/or composite video jack on a playback device.Micro SD card slotConnect to a Micro SD card for media play.HDMI Connect to the HDMI output on a playback device.USB portConnect to a USB storage device for media play.DC Edit Post Manuals+ WordPressRear viewVGA portConnect to the VGA port on a computer.Rear IR sensorRemote control Access the home menu. Access input source list.if(typeof ez_ad_units!='undefined'){ez_ad_units.push([[250,250],'manuals_plus-narrow-sky-2','ezslot_24',706,'0','0'])};if(typeof __ez_fad_position!='undefined'){__ez_fad_position('div-gpt-ad-manuals_plus-narrow-sky-2-0')};OK Confirm a selection or entry. Connect external speakers or headphones to the projector. I have read and accept the conditions contained in the Privacy Policy on processing of my data to manage my query or request.
Repairs1.12 2. Back to previous page | Do not turn off the projector or remove the USB flash drive during the update.Update SW through USBCheck the latest software version on www.philips.com/support. Language settings1.42 Bulb Life Span (h): 30000 Lens:- Focus: Manually- Zoom: Digital- Keystone Correction: Yes Field of Application:- Short Distance: No Technology:- Projection Technique: LCD- Light Source: LED- Native Resolution (Pixel): HD720 (1280 x 720)- Max. This may damage the internal components.Do not allow children to handle the product without supervision. A projector mount is required to mount the projector on ceiling. DANGER!1.49 In addition, the power consumption is far lower than a regular lamp-based projector: a bigger screen, an immersive experience with an eco-friendly device. Connect the included power adapter to the socket on the projector, and then to the wall outlet.

Select Panel Flip Rotate, and then press / to rotate or flip the projection screen.
neopix itgifts Have your product checked by an authorised service centre. With this connection, images are shown on the projection screen, and audio is played on the projector. Seal the product in a plastic bag before moving it to another room, in order for it to adapt to room conditions. Canada Regulatory ComplianceThis device complies with Industry Canada CAN ICES-3 (B)/NMB-3(B)RSS-Gen & RSS-247 statement: This device complies with Industry Canada RSS standard(s).Operation is subject to the following two conditions: The device meets the exemption from the routine evaluation limits in section 2.5 of RSS102 and users can obtain Canadian information on RF exposure and compliance.This device should be installed and operated with a minimum distance of 7.8 inches (20 centimetres) between the device and your body. Find your product (model number: NPX440), and locate Software and drivers. 1999-2022ProjectorCentral.com | 8/1/2022 10:50 AMPST, Built-in stereo speakers for crystal clear sound. 5
To help avoid possible injuries to persons or damage to the product itself, position all cables in such a way that no one will trip over them.Do not operate the product in damp rooms. Connecting to external speakers or headphones1.34 The following resolutions are supported:if(typeof ez_ad_units!='undefined'){ez_ad_units.push([[728,90],'manuals_plus-sky-4','ezslot_33',719,'0','0'])};if(typeof __ez_fad_position!='undefined'){__ez_fad_position('div-gpt-ad-manuals_plus-sky-4-0')};Press to display the input source list, and then select VGA.Connecting to external speakers or headphonesConnect external speakers or headphones to the projector. Operation is subject to the following two conditions:this device may not cause harmful interference;this device must accept any interference received, including interference that may cause undesired operation.FCC RF Radiation Exposure Statement: This transmitter must not be in co-location or operating in conjunction with any other antenna or transmitter. The LED on the projector turns from red to green. To turn off the projector, press again. Troubleshooting Power cycling1.53 Your question will be answered by email, please make sure you provide a correct email address. This user manual is a document that does not represent a contract. To adjust image focus, turn the focus knob on the top of the projector. The LED on the projector turns from green to red. The distance between the projector and the screen determines the actual size of the imageTo adjust the screen height when placing the projector on the table, turn the angle adjustment knob located on the bottom of the projector.To adjust image focus, turn the focus knob on the top of the projector.if(typeof ez_ad_units!='undefined'){ez_ad_units.push([[336,280],'manuals_plus-small-rectangle-1','ezslot_34',715,'0','0'])};if(typeof __ez_fad_position!='undefined'){__ez_fad_position('div-gpt-ad-manuals_plus-small-rectangle-1-0')};To correct keystone or distorted images to be rectangular or square, turn the keystone knob on the top of the projector.if(typeof ez_ad_units!='undefined'){ez_ad_units.push([[300,250],'manuals_plus-box-4','ezslot_10',103,'0','0'])};if(typeof __ez_fad_position!='undefined'){__ez_fad_position('div-gpt-ad-manuals_plus-box-4-0')};if(typeof ez_ad_units!='undefined'){ez_ad_units.push([[300,250],'manuals_plus-box-4','ezslot_11',103,'0','1'])};if(typeof __ez_fad_position!='undefined'){__ez_fad_position('div-gpt-ad-manuals_plus-box-4-0_1')};if(typeof ez_ad_units!='undefined'){ez_ad_units.push([[300,250],'manuals_plus-box-4','ezslot_12',103,'0','2'])};if(typeof __ez_fad_position!='undefined'){__ez_fad_position('div-gpt-ad-manuals_plus-box-4-0_2')};.box-4-multi-103{border:none!important;display:block!important;float:none!important;line-height:0;margin-bottom:2px!important;margin-left:0!important;margin-right:0!important;margin-top:2px!important;max-width:100%!important;min-height:250px;min-width:300px;padding:0;text-align:center!important}4 Connect to playback devicesNotice Make sure all devices are disconnected from the power outlet before establishing or changing any connections.Connecting to devices through HDMIConnect a playback device (e.g. Need advice? Connect a USB storage device to the USB port on the projector. 1 General safety information1.9 Beamer resolution: 800 x 480 WXGA, 1920 x 1080 HDTV. About this user manual1.3 The home menu provides easy access to media player, setup and other useful features in the projector. Dust particles and other foreign objects may damage the product.Do not expose the product to extreme vibrations. At HSN, we love our customers and their opinions. Keep writing.
projector int Connecting to a computer through VGA1.33 More information, Automatic translation
Enjoy a comfortable image, stereo sound, and all the connectivity you need for streaming your favorite content. Follow the guidelines below for different projector placement.Notice For overhead mounting on ceiling, purchase a projector mount recommended by an installation professional and follow the instructions that come with the mount.Before mounting on the ceiling, make sure the ceiling can support the weight of the projector and mounting kit.For ceiling installation, this product must be securely attached to the ceiling in accordance with the installation instructions. Never touch the mains cable or the mains connection with wet hands.The product must have sufficient ventilation and must not be covered. With this connection, images are shown on the projection screen.Notice. Find your product (model number: NPX440), and locate Software and drivers.Download the software into the USB flash drive. Unzip the downloaded software file and save it in the root directory of the USB flash drive. if the product is moved from a cold to a warm area; when the product is placed in a damp room. Check whether the mains voltage of the power supply matches the mains voltage available at the setup location. 2021 Conrad Electronic International GmbH & CoKG - All rights reserved. Keep the product away from open flames (e.g. Photo playback1.38 Select PHOTO to activate photo media player and access photo files. 5 Media playback1.35 Packaging: The presence of the logo (green dot) means that a contribution is paid to an approved national organisation to improve package recovery and recycling infrastructures. Easy to use, versatile in its application: the Philips NeoPix Easy 2+ impresses with its connection and media diversity. Shipping and returns. If the requested exchange is no longer available, including items on waitlist and advance order, HSN will issue a refund and not deduct the HSN Return Label fee. Please do not use the `Remember me` option if using a computer with public access or that is used by more than one person. Select MUSIC to activate music media player and access music files. Rear table1.24 Select SETUP, and then press OK to access the setting options. Register your product and get support at www.philips.com/support1.1
beamer leinwnde screeneo transportable dlp lumens microsd neopix If you dont, send it back within 30 days. If this device does cause harmful interference to radio or television reception, which can be determined by turning the device off and on, the user is encouraged to try to correct the interference by one or more of the following measures: FCC RF Radiation Exposure Statement: This transmitter must not be in co-location or operating in conjunction with any other antenna or transmitter.
neopix Philips NeoPix Easy 2+ Projector has the Philips official manufacturer warranty.

Leaking batteries can possibly damage the remote control.Never expose the remote control to direct sunlight.Avoid deforming, dismantling or charging the batteries.Avoid exposure to open fire and water.Replace empty batteries immediately.Remove the batteries from the remote control if not in use for long periods of time. Insert the supplied batteries (type AAA) with correct polarity (+/-) indicated.

PAYMENT OPTIONS AS LOW AS
Prices and the availability of FlexPay shown on the previously recorded video may not represent the current price options. Press to display the home menu on the projection screen. Never touch the mains cable or the mains connection with wet hands.The product must have sufficient ventilation and must not be covered. If you're not satisfied with your purchase for any reason, our return policy allows you to send back returns-eligible merchandise within 30 days of the date you received the package for an exchange. Get a super smooth experience and project pictures up to 80". Check the latest software version on www.philips.com/support. The projection screen size (or size of images) is determined by the distance between the lens of the projector and the projection surface. Always use the button to turn the projector on and off. 6 Change settings1.39 Select By continuing to browse the site you are agreeing to our use of cookies. Supported file formatsThe following file formats are supported:.dat/.mpg/.mpeg/.ts/.trp/.tp/.vob/.mp4/.mkv/.avi/.flv/.3gp, Supported file formatsThe following file formats are supported: .mp3/ .aac/.ogg/.flac, Supported file formatsThe following file formats are supported: .jpeg/.bmp/.png/.gif. Connecting to devices through AV1.32 Enjoy a pleasant picture, all the connection options you need and, thanks to the USB media player, experience a versatile projector that is convincing both at first sight and in everyday use thanks to its workmanship and modern appearance.

You won't need to replace it, it lasts 20 years if used for 4 hours per day. Remote control1.19 Detailed descriptions can be found in the following sections of this user manual.Read the entire user manual carefully.
The improper use of batteries can lead to overheating, explosion, risk of fire and injury. 3,000:1 contrast ratio -Provides a multitude of shades between black and white for rich color saturation. The projection distance is 80 cm 200 cm / 24- 60. Manufacturer Cited Brightness:
Set a time length so that the projector turns off automatically after a period of time of inactivity. To exit a particular mode, press .6 Change settingsThis section helps you change the settings of the projector.Picture settingsPress .Select SETUP, and then press OK to access the setting options.Select a picture option, and then press / to change: Picture Mode: Select pre-defined color settings for picture or video display.
neopix projection beamer Explore our home, garden & DIY catalogue.

Press to turn on the projector. Set a period of time after which the projector turns off automatically. It has a maximum brightness of 2700 lumens and can achieve up to a 120" image fr, submit your email address to receive 15% off coupon, https://i01.hsncdn.com/is/image/HomeShoppingNetwork/rocs1200/philips-neopix-easy-2-home-projector-d-2021061115202445~20176205w.jpg. The powerful LED light source displays rich, vivid colors and will last up to 30,000 hours. The playback control icons are displayed at the bottom of the projection screen. a Blu-ray player, gaming console, camcorder, digital camera or PC) to the projector through HDMI connection. Comment document.getElementById("comment").setAttribute("id","a2cdcd9422baa02e9e8f0fa02e76fb16");document.getElementById("afe6277d1c").setAttribute("id","comment"); Save my name, email, and website in this browser for the next time I comment.
Your account will remain active for 45 days. Follow the on-screen instructions to start or cancel resetting. TRADEINN RETAIL SERVICES, S.L. Your browser version is unsupported. Select a picture option, and then press / to change: Select a sound option, and then press / to change: Select OSD Language, and then press / on the remote control to select your desired language for on-screen menu.

You can access, rectify and delete your data, as well as exercise other rights by consulting the additional and detailed information on data protection in our Privacy Policy. Diagonal Screen Size (Meter): 0,5- Max. Or connect the connector on the projector to headphones. Screeneo Innovation SA shall not be held liable for any damage resulting from electromagnetic interference that occurs from the use of any interface cables other than those designated as Screeneo Innovation SA/PHILIPS products. So you never have to replace it at 4 hours per day it lasts 20 years!
neopix With this connection, audio from the projector is played through the external speakers or headphones.DANGER! In case of overheating, the product automatically switches to standby mode.Do not allow liquids to leak into the product. Subscribe now to never miss a thing from ProjectorCentral.com! jacks (red and white) and/or composite video output jack on a playback device. Place the projector on a table behind the projection screen. Live chat with us or call 13 52 44. Music playback1.37 . The desire of Screeneo Innovation SA is to operate systems respecting the environment and consequently it has decided t o integrate environmental performances in the life cycle of these products, from manufacturing to commissioning use and elimination. FEATURES:- Audio-In: 1x- Headphone Jack: Yes- D-Sub 15-pin (VGA): 1x- HDMI (Type A): 1x- USB-A: 1x USB-A 2.0- Network (RJ 45): No- Trigger-Out (12V): 1x- Memory Card Slot: microSD Equipment:- High Dynamic Range (HDR): No- Integrated Media Player: Yes- Loudspeaker Integrated: Yes- Nominal Power Loudspeaker (Watt): 2x 3 3D Projection Technique:- 3D Projection: No Energy Supply:- Energy Supply: Mains Power Consumption:- Max. Do not make any changes or settings that are not described in this user manual. During video playback, press OK. Consult the dealer or an experienced radio/TV technician for help. Have the plastic wrapping recycled or dispose of it in the non-recyclable waste, depending on the requirements in your country.Trademarks: The mentioned references in this manual are trademarks of the respective companies. (1) USB, (1) HDMI, (1) Micro SD, (1) VGA, 3.5mm jack, DC jack. Headquarters:Screeneo Innovation SA.Route de Lully 5C1131 Tolochenaz Switzerlandwww.philips.com/welcome, NeoPix Easy Mini Projector NPX440 User Manual Optimized PDFNeoPix Easy Mini Projector NPX440 User Manual Original PDF, Optoma DLP Projector User Manual - Optimized PDF Optoma DLP Projector User Manual - Original PDF, Benq Digital Projector User Manual - Download [optimized]Benq Digital Projector User Manual - Download, ViewSonic LS620X DLP Projector User Manual - Optimized PDF ViewSonic LS620X DLP Projector User Manual - Original PDF. Sound settings1.41 9. Keep the product away from open flames (e.g. The playback control icons are displayed at the bottom of the projection screen. Press to display the input source list, and then select AV. Do not spray the projector with any cleaning fluids.Wipe over the surfaces gently. Never use liquid or easily flammable cleansers (sprays, abrasives, polishes, alcohol, etc.). Place the projector on a table in front of the projection screen. As an Philips official retailer, all our offered electronics and computers items are covered by a 2 years manufacturers warranty. Instructions for cleaning!Use a soft, lint-free cloth. Be careful that you do not scratch the surfaces.Cleaning the lensUse a soft brush or lens cleaning paper for cleaning the lens of the projector.DANGER!Do not use any liquid cleaning agents!Do not use any liquid cleaning agents for cleaning the lens, to avoid damaging the coating film on the lens.Update softwareThe latest software of the projector can be found on www.philips.com/support for you to get the best features and support from the projector.Before you update the software of the projector, check the current software version: Press , and then select SETUP Info.CAUTION!