I hope this helps!  Press the hem and it should look free of puckering even with those tiny ones hidden in the back of your hem. For example, if your skirt's waist is 21 inches, then your first radius will be about 3.34 inches. Last, I folded the fabric toward the wrong side again, by approximately 1/2 inch, pressed it well, and edge-stitched the folded edge in place. Sew as close to the edge as you can. Very helpful tutorial in figuring out how to make it without a pattern.
  I will upload another sketch asap. ", have felt so I used polyester double knit fabric that I had on hand. I do have a question: it isnt clear to me what length to cut the waistband. It will need to be the same length as your radius.
  100+ [FREE] Dress Sewing Patterns for kids. You want to have the entire waistband visible when you are done sewing. This skirt has a really simple design, but looks pretty cool and its one of my favorites in summer. Measure the skirt length (from waist down to where you want the skirt to fall) and add 2 seam allowance. And thats all this cute everyday skirt is ready to wear! To learn how to add a poodle and leash to your skirt, scroll down! Then, fold some felt fabric in half and insert a pin at the halfway point along the fold. Knit materials work as well. ", How to Make a Poodle Skirt Without a Pattern and With Minimal Sewing, http://www.onecreativehousewife.com/2012/11/50s-day-poodle-skirt-tutorial.html, http://whatthecraft.com/circle-skirt-tutorial-new-and-improved/, http://www.ebay.com/gds/How-to-Iron-On-Appliques-and-Embroidered-Patches-/10000000004399537/g.html, , hacer una falda campana sin patrn y con pocas costuras, faire une jupe orne d'un caniche sans patron et avec peu de couture. Press and fold the raw edges in; press again and sew down as close to the edge as possible. I, "The concept helped, since I didn't want to buy a pattern, know how to use 2(pi)r formula, and just wanted to see, "My Mom used to make all my skirts, so I never learned how (I'm 73). You have to measure (1/2 of your waist measurement 2 inches) from the folded edge. I liked it because it was easy to make and the instructions were very clear. Line the top edge of the zip with the edge of the fabric and make a mark at the bottom of the zip.
 The best thing is that you would have made your simple skirt without any pattern whatsoever. "I made this skirt the night before for my daughter to wear to school during their Halloween theme week. So in my daughters case her waist is 28, so I get the 12 for the waistband; then do I measure straight down the fold the 22-1/2 (she is 51 and wants a 21 length), and with hips of 38, do I go straight out, perfectly parallel with the waist, the necessary 21, and then join up the far right edge of the waistband with the far right edge of the hem?
  Use the iron to press this seam open so that it is a crisp seam. Because you do not need a pattern to sew it. The measurement will be for the waistband which draws the fabric of the skirt in to fit perfectly around the waist. Place the tie on the waistband, pointy end toward the back of the skirt and sew with 1/4 allowance. Thank you for any clarification you can give. Disclosure: This post contains affiliate links. First, I stitched 1/4 away from the raw edge, then I folded the hem and pressed it in place with the iron. Sandwich the top of the skirt in between the 2 halves of the waistband, pin in place and sew with a zigzag stitch, 1/2 from the bottom of the waistband. Thats 7 inches longer than the top of the skirt, and that means that the fullness of the bottom of the skirt will be about 2 times my hip measurement, plus 8 inches. Then, pin the end of the string to the middle of the fold again and draw a second half circle above the first one. Sew two lines of stitching along the top of the skirt between the side seams using the longest stitch on the machine (sew both sides separately). However, the zigzag stitch that attaches the elastic should keep the top from fraying. Its composed of 2 identical pattern pieces.
 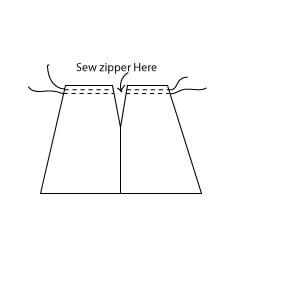 Im glad you like this skirt (its one of my favorites). This was enough for me to draw a slightly curved hemline in order to preserve the length of my skirt. Insert the elastic through this unstitched portion into the casing with a safety pin attached to one end of the elastic. You might need to anchor the pin to the table with tape to keep it from dragging the fabric around as you draw the half-circles. I think my assumption must be wrong because surely in your diagram you would have indicated that the centre fold is also the length of the skirt? Is that why we round off the corner, to bring the length back to also 21??? We use cookies to make wikiHow great. It's geometry. While youre at it, serge the top edge of the waistband. First, you will need to make a circle skirt, then add the poodle appliqu, and then finish the skirt with a wide elastic waistband. Place the two skirt pieces with right sides together and pin. Turn the waistband out to the right side and press. Felt only comes in 60 inch width. ), Your email address will not be published. Then measure your desired skirt length I wanted a midi skirt, so my skirt length is 27 inches (I added 1 inch for the hem). So, in the end, the fullness of the skirt will be about 1.7 times your waist measurement (instead of 2x). With that being said, I think theres no right or wrong way to make this skirt differences could easily pass for style/design. The waistband will look gathered once you finish sewing. So, heres how to make this easy flared summer skirt with pockets. To find out more about Lynne and her craft workshops in Essex visithttp://www.themakeitroom.co.uk/. You simply cut a rectangular piece of fabric and thread elastic through a simple casing you make and make it into a tube and you have this cute little skirt. poodle Remove tacking stitches and tie ends. By signing up you are agreeing to receive emails according to our privacy policy. Her baby sister will wear the first one now! ", used your instructions and it worked out perfectly! Im sorry but step one is completely confusing. Stitch the elastic in atleast two places to keep it in place.You can use. Align the elastic properly so that the gathers are all around the waist. For example, if your waist measurement is 28, then you will need to have 29 inches of elastic. So, the skirt is made with two pattern pieces that measure (waist measurement 4 inches) each. Did you find this summer skirt tutorial helpful? Thank you. Open the seam and iron press. Waist and hemline knots must be at correct distance from center-top pin. So the front piece would 25 and the back piece would be 25. Your email address will not be published. My granddaughter asked me to make me one, so I.
  After that, print the pocket pattern and cut the pockets. wikiHow marks an article as reader-approved once it receives enough positive feedback. Be sure to knot the ends of the thread, and to snip any excess off. poodle
 I updated the tutorial with this drawing https://static.icansewthis.com/2022/05/flared-skirt-pattern-1024712.jpg I hope it helps. However, if youre making a 21 long skirt, you may want to lengthen the back pattern piece a little bit (about 1-2, Id say) to account for the bottom. moment for me, since I didn't want to use a zipper. If you purchase something through one of those links I may receive a small commission at no extra cost to you.
  From what I read you end up with a skirt that is 8 inches shorter than your waist. If you are confident in your artistic abilities, then you can also try drawing the outline of a poodle free-hand. In the example radius instructions, multiply the total radius by two to get the length and width of fabric needed. For example, if your skirt is going to be 24 inches long, and your first radius was 3.34 inches, then your new radius will be 27.34 inches. Consider pairing this dress with some saddle shoes, a white or black blouse, and a chiffon scarf that matches the skirt. Step 1 First and foremost hem the skirt piece just turn under thebottom edge twice, 1/2 inches each. Then, measure the end of the string extending from the pen. Pin in place and sew by hand using a hemming stitch to achieve a neat result. This way, the pen marks won't show. Stitch the second row 3/8 inch from the 1st row of stitching, the third 1/8 away from the second, and the fourth 3/8 from the third. Grab the elastic, cut it to match your waist measurement and join at the ends with a zig-zag stitch. ankara skirt diy Include your email address to get a message when this question is answered. Press the seam to one side.Before sewing the other side seam overlock/zigzag both short edges separately. Joined to the identical back piece it will be 25. Happy sewing and I wish your daughter a fantastic vacation! Thanks to all authors for creating a page that has been read 571,282 times. To get a nice hemline on a circle skirt you need to follow these steps: stitch 1/4 from the edge, all around the hem. Fold the fabric in half, lengthwise, iron then open the strip and fold each half again and iron. I didn't need to hem this because that fabric doesn't fray. Fold your fabric in half, and measure 1/2 of your waist measurement minus 2 inches from the folded edge.
  I would extend the piece from the center fold while the side seams remain the same. So, in the end, the fullness of the skirt will about 1.7 times your waist measurement. You should end up with something that looks like a rainbow, or half a doughnut. Okay, I just realized there are 2 pieces, like youve been saying all along. Our directory allows stitchers to locate online retailers where they can stock up on fabric and more. Turn the fabric right side out and use a skewer or a pencil to push the pointy corner out.
  C=2r (Circumference = 2 x 3.14 x radius). How else will I know what angle to put the sides edges at? I hope to inspire you to make something new and fun today! It also keeps idle hands busy. Fold using this stitch as a guide and stitch 1/8 around the hem (ignore my pins, theyre pinned the wrong way). Thank you for the kind words! Visit our Cookie Policy. In the end, the top of the skirt will be (2x waist measurement minus 8), while the bottom of the skirt will be (2x hip measurement plus 8 inches). If that is true this simple skirt I am making is the best thing since the sewing machine was invented. skirt sew without sewing
  Would you clarify? Ill try to explain better what happens at Step 1. A sewing machine will give you the cleanest finish, but you can also use fabric glue to tack the two edges down instead.
  (If you are using lining keep the skirt and lining together and make the waistband casing together as one fabric. I made a double-fold hem for my skirt. Many fabrics require hemming, however if you use a fleece, felt,or spandex fabric, or anything else that doesn't fray, hemming isn't necessary. I didnt do this for my midi skirt because I didnt think it was likely to be noticed. Cut 3/4 elastic equalling waist round -1. To make my skirt, I used a lightweight cotton fabric and 1/8 wide elastic for the waistband. % of people told us that this article helped them. At the top of the skirt, I measured 12 inches (my waist measurement is 27.5 inches). By using our site, you agree to our. hubpages Learn how to make a simple summer skirt with an elastic waistband and pockets with this step-by-step tutorial. I cut mine to be 6 wide. Tie a knot, do not cut as cutting the string will leave a frayed edge that the pin will instantly slip out of. With the gathered side upwards machine around the top of the skirt keeping the gathers even as sewn and keeping a 1.5cm/5/8 inch seam. So happy to hear this, Este! Your fabric is on the fold, and now you have to trace the first pattern piece of your skirt. Stitch along the entire length of both side seams and around the pockets. Turn the skirt inside out and fold the raw edge of the waistband under so that the folded edge meets the stitching line and press. Hi, Im Violet!Welcome to I CAN SEW THIS!This is my little happy place where I share my sewing projects and ideas. Yes, but you will also need a height measurement. Now you have to cut the back pattern piece it will be identical to the front. This article was co-authored by wikiHow Staff. I recently started sewing and this was easy and a great learning experience. But. Make a gentlycurved hemline. I made my tie 20 long each and as wide as the finished waistband which was 1 1/2. With right sides of the fabric together pin the right-hand edges together (this is the short edge), machine together with a 1.5cm or (5/8 inch) seam. Make your waistband. Hi Dana, Thank you for your comment! I didn't, "I made the skirt on my own just the way you did, but I couldn't figure out how to attach the leash to the skirt. Heres how I constructed this skirt. You can also use a serged and turned hem or make a narrow hem with your serger. Once this has been completed, add a skirt hook and bar to secure the waistband in place and keep the zip from coming undone. As per this table, you should be cutting a fabric piece of the following dimensions, Length = length of the skirt you need + 2.25 inches extra for the hem and waistband, Width = 2 times your waist round + 1 ( or 1.5 times your hip round + 1). So buy only the length you need for the big circumference you figured out using the method above. dirndl tracey
  Thank you!
  Why not make our no pattern t-shirt and dress next? The Sewing Directory is a free resource for hobby sewists, packed with hundreds of sewing projects, expert technique guides and sewing features. Then I happened on your how-to article, and I am so pleased that this is how I attached my leash and poodle. Use the zipper foot on the machine to sew down one side, open the zip and machine to the puller, make sure the needle is in the fabric, raise the foot and pull the zip up to the top, change the foot to the other side and repeat on reaching the end sew across the bottom of the zip to secure this and prevent the seam opening up. Place the zip underneath the edges and carefully pin in place, pin down one side of the zip and then down the other. Simple is the new smart. To make an easy poodle skirt without a pattern, start by measuring your waist, adding 2 inches, and then dividing that number in half to get the radius for your skirt. How do you end up with 2X the waist measurement minus 8 inches when you have cut down the waist measurement by 4 total? Tie the ties and make a nice bow and youre done. Measure down about 3 from the top of the skirt pieces (just ignore the waistband piece) and mark that point this is where youll start lining up the top of your pockets. Zig-zag or serge around the raw edges to keep them from fraying. To make your circle skirt pattern, take your hips measurement, around the widest area, add 1-2 for allowance and divide the amount by 6.28 to calculate your circles radius (inner circle). Take your waist measurement (this is used for the construction of the waistband). But if the centre fold is the length of the skirt, taht makes the right sides LONGER than the length of the skirt. Elastic waistband was the "duh!" This will help prevent the elastic from fraying. Without some kind of direction, I could go straight down from the waistband, I could go out anywhere from 20 degrees to 90 degrees out from the waistband. skirt pattern paneled patterns without untrainedhousewife sewing At the bottom, I measured 19 inches that 1/2 my hip measurement, plus 2 additional inches. Thank you! Now do the same for the length. Approved. When you are done sewing, you should have a sleek waistband for your skirt. Can you pls clarify?? Thank you so much for this! Comment *document.getElementById("comment").setAttribute("id","ab9fcc0b8deaf6c972a0567d2942313a");document.getElementById("b077c9d9a5").setAttribute("id","comment"); This website uses cookies. Required fields are marked *. Start to gather up the top edge of the skirt to fit the waistband, pull the underneath thread as this is easier to gather. So if my waist measurement is 29 then half that is 14.5 minus 2 equals 12.5 . Measure your desired length from the inner circle, not from the corner. This article received 15 testimonials and 97% of readers who voted found it helpful, earning it our reader-approved status. skirt circle pattern cut diy without poodle easy skirts cutting sewing circular way needed simple Pin and stitch the whole seam, the top section above the mark in the largest stitch the machine will sew, then sew the rest of the seam in a smaller stitch to the bottom. Set your iron to the hottest setting (no steam) and press down on the patch for 35 to 45 seconds. You only need your waist measurement to make this skirt.
  Sign up for wikiHow's weekly email newsletter. poodle skirt pattern without sewing minimal skirts easy wikihow Dont forget to add seam allowance all around your inner circle. The fabric for my tie was 21 x 4, seam allowance included. Thank you for stopping by!
  Hi Delia, The bottom is a bit rounded I realised this only after finishing the drawing. Place pins a few inches apart and add a couple more in between those. I cant quite make out if the bottom is rounded or straight across.
 Start by laying the fabric out with the selvedge edges together, make sure the selvedges are lined up accurately and that there are no folds in the fabric, press if necessary. You can use the calculator above to find the final measurements but dont forget to use hip measurements instead of waist measurements. Turn the skirt inside out and place the piece of fabric on the back, right where the patch is. If you want to line this skirt, cut lining the same as the main fabric. Then stitch the pocket pieces on the side seam of the skirt make sure the pockets are symmetrical on both sides. Youll need two identical pieces that are mirror images to each other and these two pieces form one pocket. That is your guide for the double hem. Cut your pattern around the inner circle than around the outer circle. sewingsupplies top11office Turn the waistband right side out and iron. skirt circle pattern without sewing {"smallUrl":"https:\/\/www.wikihow.com\/images\/thumb\/4\/4c\/Make-a-Poodle-Skirt-Without-a-Pattern-and-With-Minimal-Sewing-Step-1-Version-2.jpg\/v4-460px-Make-a-Poodle-Skirt-Without-a-Pattern-and-With-Minimal-Sewing-Step-1-Version-2.jpg","bigUrl":"\/images\/thumb\/4\/4c\/Make-a-Poodle-Skirt-Without-a-Pattern-and-With-Minimal-Sewing-Step-1-Version-2.jpg\/aid1304321-v4-728px-Make-a-Poodle-Skirt-Without-a-Pattern-and-With-Minimal-Sewing-Step-1-Version-2.jpg","smallWidth":460,"smallHeight":345,"bigWidth":728,"bigHeight":546,"licensing":"
License: Creative Commons<\/a> License: Creative Commons<\/a> License: Creative Commons<\/a> License: Creative Commons<\/a> License: Creative Commons<\/a> License: Creative Commons<\/a> License: Creative Commons<\/a> License: Creative Commons<\/a> License: Creative Commons<\/a> License: Creative Commons<\/a> License: Creative Commons<\/a> License: Creative Commons<\/a> License: Creative Commons<\/a>
\n<\/p>
\n<\/p><\/div>"}, {"smallUrl":"https:\/\/www.wikihow.com\/images\/thumb\/7\/7b\/Make-a-Poodle-Skirt-Without-a-Pattern-and-With-Minimal-Sewing-Step-2-Version-2.jpg\/v4-460px-Make-a-Poodle-Skirt-Without-a-Pattern-and-With-Minimal-Sewing-Step-2-Version-2.jpg","bigUrl":"\/images\/thumb\/7\/7b\/Make-a-Poodle-Skirt-Without-a-Pattern-and-With-Minimal-Sewing-Step-2-Version-2.jpg\/aid1304321-v4-728px-Make-a-Poodle-Skirt-Without-a-Pattern-and-With-Minimal-Sewing-Step-2-Version-2.jpg","smallWidth":460,"smallHeight":345,"bigWidth":728,"bigHeight":546,"licensing":"
\n<\/p>
\n<\/p><\/div>"}, {"smallUrl":"https:\/\/www.wikihow.com\/images\/thumb\/2\/2c\/Make-a-Poodle-Skirt-Without-a-Pattern-and-With-Minimal-Sewing-Step-3-Version-2.jpg\/v4-460px-Make-a-Poodle-Skirt-Without-a-Pattern-and-With-Minimal-Sewing-Step-3-Version-2.jpg","bigUrl":"\/images\/thumb\/2\/2c\/Make-a-Poodle-Skirt-Without-a-Pattern-and-With-Minimal-Sewing-Step-3-Version-2.jpg\/aid1304321-v4-728px-Make-a-Poodle-Skirt-Without-a-Pattern-and-With-Minimal-Sewing-Step-3-Version-2.jpg","smallWidth":460,"smallHeight":345,"bigWidth":728,"bigHeight":546,"licensing":"
\n<\/p>
\n<\/p><\/div>"}, {"smallUrl":"https:\/\/www.wikihow.com\/images\/thumb\/a\/a3\/Make-a-Poodle-Skirt-Without-a-Pattern-and-With-Minimal-Sewing-Step-4-Version-2.jpg\/v4-460px-Make-a-Poodle-Skirt-Without-a-Pattern-and-With-Minimal-Sewing-Step-4-Version-2.jpg","bigUrl":"\/images\/thumb\/a\/a3\/Make-a-Poodle-Skirt-Without-a-Pattern-and-With-Minimal-Sewing-Step-4-Version-2.jpg\/aid1304321-v4-728px-Make-a-Poodle-Skirt-Without-a-Pattern-and-With-Minimal-Sewing-Step-4-Version-2.jpg","smallWidth":460,"smallHeight":345,"bigWidth":728,"bigHeight":546,"licensing":"
\n<\/p>
\n<\/p><\/div>"}, {"smallUrl":"https:\/\/www.wikihow.com\/images\/thumb\/2\/28\/Make-a-Poodle-Skirt-Without-a-Pattern-and-With-Minimal-Sewing-Step-5-Version-2.jpg\/v4-460px-Make-a-Poodle-Skirt-Without-a-Pattern-and-With-Minimal-Sewing-Step-5-Version-2.jpg","bigUrl":"\/images\/thumb\/2\/28\/Make-a-Poodle-Skirt-Without-a-Pattern-and-With-Minimal-Sewing-Step-5-Version-2.jpg\/aid1304321-v4-728px-Make-a-Poodle-Skirt-Without-a-Pattern-and-With-Minimal-Sewing-Step-5-Version-2.jpg","smallWidth":460,"smallHeight":345,"bigWidth":728,"bigHeight":546,"licensing":"
\n<\/p>
\n<\/p><\/div>"}, {"smallUrl":"https:\/\/www.wikihow.com\/images\/thumb\/7\/77\/Make-a-Poodle-Skirt-Without-a-Pattern-and-With-Minimal-Sewing-Step-6-Version-2.jpg\/v4-460px-Make-a-Poodle-Skirt-Without-a-Pattern-and-With-Minimal-Sewing-Step-6-Version-2.jpg","bigUrl":"\/images\/thumb\/7\/77\/Make-a-Poodle-Skirt-Without-a-Pattern-and-With-Minimal-Sewing-Step-6-Version-2.jpg\/aid1304321-v4-728px-Make-a-Poodle-Skirt-Without-a-Pattern-and-With-Minimal-Sewing-Step-6-Version-2.jpg","smallWidth":460,"smallHeight":345,"bigWidth":728,"bigHeight":546,"licensing":"
\n<\/p>
\n<\/p><\/div>"}, {"smallUrl":"https:\/\/www.wikihow.com\/images\/thumb\/c\/c4\/Make-a-Poodle-Skirt-Without-a-Pattern-and-With-Minimal-Sewing-Step-7-Version-2.jpg\/v4-460px-Make-a-Poodle-Skirt-Without-a-Pattern-and-With-Minimal-Sewing-Step-7-Version-2.jpg","bigUrl":"\/images\/thumb\/c\/c4\/Make-a-Poodle-Skirt-Without-a-Pattern-and-With-Minimal-Sewing-Step-7-Version-2.jpg\/aid1304321-v4-728px-Make-a-Poodle-Skirt-Without-a-Pattern-and-With-Minimal-Sewing-Step-7-Version-2.jpg","smallWidth":460,"smallHeight":345,"bigWidth":728,"bigHeight":546,"licensing":"
\n<\/p>
\n<\/p><\/div>"}, {"smallUrl":"https:\/\/www.wikihow.com\/images\/thumb\/0\/03\/Make-a-Poodle-Skirt-Without-a-Pattern-and-With-Minimal-Sewing-Step-8-Version-2.jpg\/v4-460px-Make-a-Poodle-Skirt-Without-a-Pattern-and-With-Minimal-Sewing-Step-8-Version-2.jpg","bigUrl":"\/images\/thumb\/0\/03\/Make-a-Poodle-Skirt-Without-a-Pattern-and-With-Minimal-Sewing-Step-8-Version-2.jpg\/aid1304321-v4-728px-Make-a-Poodle-Skirt-Without-a-Pattern-and-With-Minimal-Sewing-Step-8-Version-2.jpg","smallWidth":460,"smallHeight":345,"bigWidth":728,"bigHeight":546,"licensing":"
\n<\/p>
\n<\/p><\/div>"}, {"smallUrl":"https:\/\/www.wikihow.com\/images\/thumb\/3\/39\/Make-a-Poodle-Skirt-Without-a-Pattern-and-With-Minimal-Sewing-Step-9-Version-2.jpg\/v4-460px-Make-a-Poodle-Skirt-Without-a-Pattern-and-With-Minimal-Sewing-Step-9-Version-2.jpg","bigUrl":"\/images\/thumb\/3\/39\/Make-a-Poodle-Skirt-Without-a-Pattern-and-With-Minimal-Sewing-Step-9-Version-2.jpg\/aid1304321-v4-728px-Make-a-Poodle-Skirt-Without-a-Pattern-and-With-Minimal-Sewing-Step-9-Version-2.jpg","smallWidth":460,"smallHeight":345,"bigWidth":728,"bigHeight":546,"licensing":"
\n<\/p>
\n<\/p><\/div>"}, {"smallUrl":"https:\/\/www.wikihow.com\/images\/thumb\/5\/58\/Make-a-Poodle-Skirt-Without-a-Pattern-and-With-Minimal-Sewing-Step-10-Version-2.jpg\/v4-460px-Make-a-Poodle-Skirt-Without-a-Pattern-and-With-Minimal-Sewing-Step-10-Version-2.jpg","bigUrl":"\/images\/thumb\/5\/58\/Make-a-Poodle-Skirt-Without-a-Pattern-and-With-Minimal-Sewing-Step-10-Version-2.jpg\/aid1304321-v4-728px-Make-a-Poodle-Skirt-Without-a-Pattern-and-With-Minimal-Sewing-Step-10-Version-2.jpg","smallWidth":460,"smallHeight":345,"bigWidth":728,"bigHeight":546,"licensing":"
\n<\/p>
\n<\/p><\/div>"}, {"smallUrl":"https:\/\/www.wikihow.com\/images\/thumb\/9\/9b\/Make-a-Poodle-Skirt-Without-a-Pattern-and-With-Minimal-Sewing-Step-11-Version-2.jpg\/v4-460px-Make-a-Poodle-Skirt-Without-a-Pattern-and-With-Minimal-Sewing-Step-11-Version-2.jpg","bigUrl":"\/images\/thumb\/9\/9b\/Make-a-Poodle-Skirt-Without-a-Pattern-and-With-Minimal-Sewing-Step-11-Version-2.jpg\/aid1304321-v4-728px-Make-a-Poodle-Skirt-Without-a-Pattern-and-With-Minimal-Sewing-Step-11-Version-2.jpg","smallWidth":460,"smallHeight":345,"bigWidth":728,"bigHeight":546,"licensing":"
\n<\/p>
\n<\/p><\/div>"}, {"smallUrl":"https:\/\/www.wikihow.com\/images\/thumb\/8\/87\/Make-a-Poodle-Skirt-Without-a-Pattern-and-With-Minimal-Sewing-Step-12-Version-2.jpg\/v4-460px-Make-a-Poodle-Skirt-Without-a-Pattern-and-With-Minimal-Sewing-Step-12-Version-2.jpg","bigUrl":"\/images\/thumb\/8\/87\/Make-a-Poodle-Skirt-Without-a-Pattern-and-With-Minimal-Sewing-Step-12-Version-2.jpg\/aid1304321-v4-728px-Make-a-Poodle-Skirt-Without-a-Pattern-and-With-Minimal-Sewing-Step-12-Version-2.jpg","smallWidth":460,"smallHeight":345,"bigWidth":728,"bigHeight":546,"licensing":"
\n<\/p>
\n<\/p><\/div>"}, {"smallUrl":"https:\/\/www.wikihow.com\/images\/thumb\/b\/bd\/Make-a-Poodle-Skirt-Without-a-Pattern-and-With-Minimal-Sewing-Step-13-Version-2.jpg\/v4-460px-Make-a-Poodle-Skirt-Without-a-Pattern-and-With-Minimal-Sewing-Step-13-Version-2.jpg","bigUrl":"\/images\/thumb\/b\/bd\/Make-a-Poodle-Skirt-Without-a-Pattern-and-With-Minimal-Sewing-Step-13-Version-2.jpg\/aid1304321-v4-728px-Make-a-Poodle-Skirt-Without-a-Pattern-and-With-Minimal-Sewing-Step-13-Version-2.jpg","smallWidth":460,"smallHeight":345,"bigWidth":728,"bigHeight":546,"licensing":"
\n<\/p>
\n<\/p><\/div>"}, {"smallUrl":"https:\/\/www.wikihow.com\/images\/thumb\/f\/fb\/Make-a-Poodle-Skirt-Without-a-Pattern-and-With-Minimal-Sewing-Step-14.jpg\/v4-460px-Make-a-Poodle-Skirt-Without-a-Pattern-and-With-Minimal-Sewing-Step-14.jpg","bigUrl":"\/images\/thumb\/f\/fb\/Make-a-Poodle-Skirt-Without-a-Pattern-and-With-Minimal-Sewing-Step-14.jpg\/aid1304321-v4-728px-Make-a-Poodle-Skirt-Without-a-Pattern-and-With-Minimal-Sewing-Step-14.jpg","smallWidth":460,"smallHeight":345,"bigWidth":728,"bigHeight":546,"licensing":"