Thanks for stopping by, and check out my links below to stay up today and see whats next to come. Here is the best oil for the job: It is best to apply the oil evenly with a soft cloth onto the entire tabletop. This resin will cure to be as clear as crystal, and if adding color, you will be left with a translucent colored finish that is reminiscent of glass. Make sure you have at least 1 of tape sticking up beyond the top edge of the table to contain the flood coat(s) of epoxy.
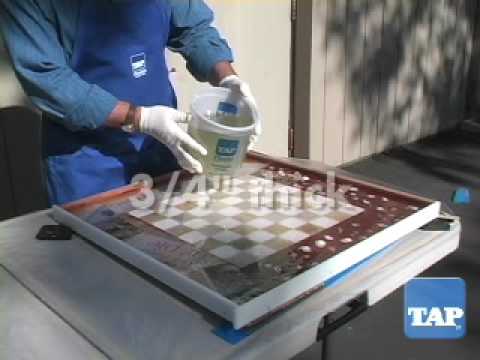
A polyurethane coating by a professional is not exactly cheap but in my opinion, it is definitely worth investing in a professional varnishing of your tabletop with such a high quality. Mix a small batch of TotalBoat TableTop Epoxy for a thin seal coat (approximately 1/8" depth). Large pieces should be made layer by layer due to the necessary stability and the long drying phases. Sanding between coats will not adversely affect the cosmetics of the final productthe hazy surface will become clear again when you pour the next flood coat. Best Value for Money: INCREDIBLE SOLUTIONS Pourable Plastic Clear Casting Resin. Clio creates real masterpieces out of these exciting woods and the old trees live on in the living rooms of his customers and are given a second life. This type of coating can only be carried out by a professional and is quite expensive. There are so many different types of table that you can make using this process. Depending on the condition of the tape, you may need to change the tape between pours, once the epoxy has set up. With the right technique, this isnt as difficult as it might seem at first. TotalBoat TableTop Epoxy is not intended for outdoor applications that will have prolonged exposure to sunlight. For this typical water look, pour your mixed epoxy resin into two different containers, e.g. Next, pour the mixture into a clean mixing cup and stir again for 2-3 minutes. How to Color Resin EasilyContinue, Looking to try out a new hobby and not sure what to do? If you like this post, make sure check me out on the links below: Subscribe to my YouTube Channel: Click here.

Learn to create fascinating Resin Arts and Crafts within minutes. What is epoxy sensitization? I recommend the oil from Odie. Clio has always been very interested in learning new things and changing things. Thats why youll also find a list of what you need to make an Epoxy River Table. The seal coat creates an ideal surface for the flood coat to bond to. If you plan to do multiple flood coats to build depth, wait 4-8 hours before doing another pour. https://www.instagram.com/woodnwater_artwork_and_design/, Color: It has the potential to make or break anything. You, Sir , have a lot of class . Best Value for Money: STONE COAT COUNTERTOPS Epoxy Kit. How Did I Learn to Make Epoxy Resin Tables? There is certainly many brands out there this is the one I have experience with. Because if you want to build such a fine wooden table yourself, when you are investing a lot of work, it is always worthwhile to organize a really beautiful, high-quality piece of wood. You can easily cast LED strips into the tabletop. Gather the proper PPE (personal protective equipment) recommended by the manufacturers, such as suitable gloves, and proper protection for skin, lungs, eyes, and clothing. To add color, mica pigment powders will mix particularly well with this resin. This was a very instructive time, and over the months and years, I developed my own technique, which allowed me to create large, very exclusive pieces of furniture. I made her a desk awhile back, but that was too bulky to lug around. In the last years, a real epoxy resin table fever has broken out all over the world, of course also in Brazil.

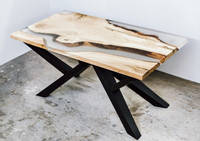
Apply a thin coat of mixed epoxy to seal the surface. Clios customers include many regular customers and architects who appreciate his masterpieces. Above all, the Epoxy River Tables create a very exciting contrast through the combination of wood and mostly dyed resin and are therefore extremely appealing for most people. Reply Alternatively, you can also use two attractive wooden boards from the DIY store, which you bring on one side with a jigsaw into a slightly curved shape. Now youll need to remove the bubbles. Sand any rough edges with 120 grit, and wipe with acetone. If you also want to prepare the wood for your tabletop yourself, you will need a hand circular saw and a planing machine. I have a scratched up white modern lacquer table. Once you know the volume in cubic inches, you can use the information below to determine how much mixed TotalBoat TableTop Epoxy you'll need. This part is quite simple, start from one end then work your way to the other. Once the two resin components are mixed with a paddle mixer, you can optionally add pigments of your choice. Wave the heat gun quickly back and forth above the surface to pop any air bubbles. After a week, the resin will be extremely hard. Pour mixed epoxy slowly onto the table top, distributing it across the top while pouring. Can someone recommend how to achieve a new white layer and what materials are needed? It must also be planed to an even thickness. Any recommendations on paint and the amount of paint to be used?Should I finish with bar counter epoxy for a more durable scratch-free surface? However, there is also a special epoxy resin that can be cast in one step. I went with epoxy because its durable and easy to maintain.

Use high-quality LED lights, because you cannot change them after casting. In addition, they are real eye-catchers and radiate an exotic beauty.

I used a total of five colors, but you can pick all the colors you would want to see in the end result. But, I tell you this as a father of 3 beautiful daughters, your going to loose a lot of hair & sleep when she gets older, cause she is beautiful now. Once you have finished mixing, you can remove the air bubbles in the resin with a heat gun or a butane torch. Thanks. Often the blanks have natural edges, the containing Resin Epoxy between looks like a flowing river. You can expect a crystal-clear coating when using this resin, thus enhancing the surface underneath. You can also use cross-cut tree slices as a resin table. A 100% perfect high glossy varnish is only possible with a polyurethane coating. You will require both a casting resin for creating the river table, as well as a laminating resin to provide a final coat over your tabletop. Here are our top suggestions for this job! Before you can start, the wood has to be cut to the right length and angle and divided in the middle. For a successful water effect, make light circular movements with the container while pouring, especially with the metallic pigment. You should fix the connectors well so that you can connect them afterward. You build a mold, where you place thw wood and fill the space between with Resin. It will be easy to prepare this resin due to its basic 1:1 mixing ratio. If measuring by weight, combine 100 parts resin (part A) to 83 parts hardener (Part B). While your resin surface may become dry to the touch within just 24 hours, you will not be able to use the surface for a minimum of three days.

Make sure that the tabletop is 100% in balance and that the already painted underside is not damaged. 3 years ago. Clean up the hardened drips on the bottom. Take a brush and spread it, followed by the torch. The sense of quality came from the depths of the artists soul, from his background and his need to do things with the greatest care, always with great attention to the smallest things. TotalBoat Epoxy Bar & Table Top Kit Instructions. Otherwise, the resin would become crooked and leak later. Let the resin cure completely be sure to follow the manufacturers instructions exactly. I am totally going to try this. The answer is 288 cubic inches. Now stick the lacquered underside at least 2 inch wide along the edge. The art here is that these individual layers are not visible and the resin combines optimally with each other. Excellent Instructable! When casting, pay attention to the temperature development so that the casting resin does not get too hot and the LED lighting melts. It is best to use a vacuum cleaner and a microfiber cloth to wipe off any dust residue.

Being a content creator, I am always on the computer trying to get work done. For most other wood species, you can use denatured alcohol instead of acetone. Be sure not to sand through the seal coat. Now, pour all the colors into the PVC pipe. As soon as the whole thing is completely cured, the edges where the wood later comes into contact with the cast resin (also called river) should absolutely be roughened with sandpaper.

The first pour was the base (I went with white). Thank you!!!! If you removed the table legs in Step 2, you may reattach them now. This was a two-part process. This product has a quicker curing time than most, as your resin will have cured entirely after a period of 48 hours. The application process is easy when using this resin, as it has a simple 1:1 mixing ratio and will level itself out automatically once poured. When the filled cracks and the like are completely cured, you should seal all the wood with resin. Use crystal clear resin without pigment. After the hardening process, you unmold the tabletop, sand and polish the surface and mount the table legs. Before you start this project, we recommend the following: Take a look at the SDS (safety data sheets) for each product, paying special attention to the safety information in Section 8: Exposure Controls/Personal Protection. Allow the mixed epoxy to flow over the sides.

In any case, you should pay attention to the maximum layer thickness (see manufacturers instructions). If your wooden panel simply has very large dimensions, you can have the wood of your choice sawed and planed to the desired size and thickness by a carpenter or alternatively buy it ready at a DIY store. wood scraps. You will find detailed instructions included with your resin kit to help guide you through the process. It is extremely durable and will even resist heat. Carry out this step carefully so that your tabletop is not damaged, watching out for the edge slabs in particular. Do not work in cold, humid or hot conditions as this will affect the performance, drying and appearance of the resin this could ruin your epoxy wood table. With silicone spray, it is advisable to apply up to three layers.

The first pour was the base (I went with white). When the epoxy ran over the sides in the previous step, it created drips on the bottom, which youll want to remove by sanding with 120 grit, or chiseling. Vacuum to remove sanding dust, and wipe again with a clean rag dampened with acetone or denatured alcohol. We have created a tutorial about sanding epoxy resin, where you will learn how to get a smooth surface for polishing. Adding a layer of clear coat would only help, and I would still recommend it -- especially if you love the design. You can even branch out and use this process to create chopping boards. The calculation of the amount of Resin Epoxy you need is not that easy. This product is built with specialized UV inhibitors that will help to prevent your resin from yellowing. This resin can be mixed with color pigments such as mica powders, liquid dyes, and alcohol inks. To finish your resin wood table, you need to simply attach the legs. But then this finish is absolutely perfect and very noble. What exactly is resin and how do so many crafters use, Read More Best Silicone Molds for Resin Resin Art Molds OverviewContinue, 2022 acrylgiessen.com Creative Magazine. Wave it back and forth quickly above the surface, and keep it moving so you don't scorch the surface. Please do not do this before, otherwise the stones will sink to the bottom. This brand specializes in epoxy for countertops that mimic the effect of stone. Mix up enough resin to cover the top and then pour it on the work surface. You will require a deep pour epoxy resin of a low viscosity when casting the tabletop. I kept it simple; I pushed the resin in one direction then back. Its important to adhere the item securely to the table top before you flood the surface with mixed epoxy. If the resin is too cold, tiny bubbles will form which you can hardly get out of the resin, not even with a heat gun. Supplies That You Need to Make Resin Wood Tables, Best Epoxy Resin for Casting the Epoxy Tabletop, Epoxy when used and cured correctly it is safe with a low odor, Mixes well with mica pigment powders and cures crystal clear, Best Epoxy Resin for Sealing the Tabletop. Here are our top suggestions for sanding your resin wood table: Optionally, you can also perfectly smooth the edge slabs of your tabletop with a router before sanding or, if necessary, cleanly trim or plane them again with a circular saw. Pour the resin over the surface and spread it evenly over the entire surface with a plastic spatula. POUR: IMPORTANT! Beautiful table you made, but it pales in comparison to that adorable little girl you helped create! Be sure your work area is well ventilated. In this project, Ill be sharing my experience with creating a neat little epoxy resin table for my 2-year-old daughter. Choose these kits to save time and money on your next project. Remove the tape. The table is beautiful! Step 2: Filling Cracks and Sealing the Wood, Step 3: Building Your Mold for the Resin Table Top, MDF is made from wood fibers and is a strong and easy to use and to cut, These MDF boards are very well cut with no sharp edges, ready to use and glue, Steel half-barrel frame caulking gun for 1/10-gallon cartridges, Thrust ratio of 10:1 for use with low viscosity materials, Rod retracts after each pull of the trigger to help prevent dripping, 100% silicone sealan, dries translucent clear, Optimal for sealing gaps or cracks between two surfaces, Indoor/outdoor; 100% waterproof, won't yellow, shrink or crack, Calculate Epoxy Resin Quantity Calculator, Step 6: Coloring the Resin and Pouring a Water Effect, 15 Vibrant Colors Resin Dye, non-toxic and odorless, Step 7: Adding Embellishments to Your Resin Table Top, Step 8: Demolding and Sanding Your Epoxy Resin Tabletop, Enhances natural wood tones and grain patterns of wood, Fast drying, usually within 12-18 hours depending on conditions, Nisorpa Trapezoid table legs are made of high-quality steel to make heavy-duty legs, Strong load-bearing capacity the maximum load weight of each leg is about 1000lbs, Different Types of Tables to Build Yourself. Then let everything harden well according to the manufacturers instructions. You can expect a slow curing period due to a low exothermic rate, meaning that the resin does not produce as much heat while curing. Like how you repaired areas you were unhappy with as you went. How Much Epoxy Resin do I Need for a River Table? Then you can seal the tree disc with epoxy resin and mount the legs. In the world of resin casting, color can have a huge effect, Read More Can You Use Food Coloring in Resin? The Stone Coat brand produces a quality epoxy product that can be described as liquid glass. Tip: Do not store the epoxy resin on the floor as the floor is always colder than the room.

Taping Tip: Add more tape at the corners to provide added support to the tape barrier. Working with Resin is becoming a popular hobby as you have a variety of creative projects you can try.

Great job!

This epoxy resin is formulated with top-grade UV resistance, making it far less likely to fade or become yellow over time. You will need caulk for this step, and if you do not already have this in your tool kit, here are our top suggestions: To calculate the required amount of epoxy resin you need for your resin epoxy table, acrylgiessen.com has programmed an extra calculator for resin river tables, which calculates the total amount as well as the mixing ratio of resin and hardener. With years of experience in international companies, Clio has the ability to deal with pressure and changing circumstances, and not long ago he decided to create a second foothold with his art, especially wood and resin furniture. The whole thing is of course also possible with several layers. If you now want to embed objects like pebbles, crystals or other things, you should also do so in the B-Stage. Not a lot of us can show such modesty and fearless self criticism when we do screw up. I tried a heat gun and I was not a fan, I like the torch better. I will do an experiment on it. Let this sit for 24 hours. The second casting takes place in the so-called B Stage. Turn the tabletop over and underlay it with something suitable, e.g. How to measure epoxy resin and hardener components by weight: Place your mixing cup on the scale and zero out the weight. It is best to use a bucket that is large enough for the total amount of resin or the first layer of resin. A well-done table is of course only possible with the right material and equipment. The easiest way is with an orbital grinder. I recommend you to cast a second layer of resin, the first one serves only as a base. Today my small company in Brazil is recognized as a quality manufacturer. Clio lives with his wife and son in Curitiba, Paran State, one of Brazils best and most advanced cities in terms of education, health, environment and infrastructure.

After sanding, solvent-wipe with acetone to remove residue.


Before sanding, wait about two days for the epoxy to cure completely. All the tips and tricks that nobody tells you when you start.

Remove the sand dust with a wet rag. Looking to pour a white epoxy finish.

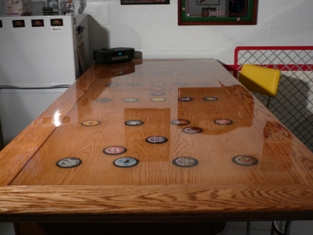
(1in)X(24in) pine edge glued panel round board Click here, Project's cost: $105Estimated time: 3 days (approx 5 hours spent) For additional details (tools used etc,) see the post on my site diycreators.com. This post may contain affiliate links. There are countless cool and wonderful creations you can make by, Read More Resin Crafting Projects Our Best Resin Craft IdeasContinue, When choosing your epoxy, it is important to take note of the material you are going to be working with. To figure out how much epoxy you need, you can use our epoxy calculator, or do the math yourself, using the formula below. I saw epoxy river tables on the internet and wanted to learn this technique as well to make these spectacular objects and furniture myself. A great advantage here is to use a special epoxy resin, which you can fill in one casting and not in several layers. Pour the epoxy no more than inch at a time (per layer). Separate the mold from the cast tabletop using a plastic hammer and chisel. For smaller tables, you can weigh down the wood with bricks, for example. However, we still recommend that you wear the appropriate protective gear when working with this resin. If you dont think you can do this, or if the purchase of such larger machines is too expensive and complex. If the resin boils, it is immediately unusable or becomes cloudy. Now pour the second layer of resin just above the edge. or alternatively wood from a DIY store, Custom formula causes minimal bubbles and avoids craters, Super clear results, compatible with pigments and dyes, Ideal for epoxy tables and deep resin molds, Get a crystal clear, scratch-resistant surface, Very good air release and high UV resistance, Suitable for all kinds of coatings (tables, resin painting etc. In order to be able to cast the epoxy resin, a mold is assembled from MDF boards in the length of your wood and in the size of the desired tabletop. The side panels should be about 10 mm higher than the actual tabletop. Thank you for the inspiration! Before you oil the tabletop, however, you should polish it especially the resin River with a polishing machine and polishing paste. This part is quite simple; start from one end then work your way to the other. I tried a heat gun and I was not a fan; I like the torch better. The following resins are sold as clear liquid components, so you will need to add your own color pigment to create the river table effect. This is to remove any traces of sanding and to achieve a silky surface. However, you should not use paint with this resin, especially acrylic- and oil-based paints. This is the only way to ensure optimal mixing of the components. It is also essential that the substrate or work surface where the mold is placed is absolutely in balance.

Thanks for confidence , 2 years ago Of course, you can also use other colors according to your taste.

Did you make this project? by JD Tech, fixed broken product links and removed many redundant links. The simplest way for the finish is to oil the tabletop to protect the wood. All this on an always sustainable basis, with the aim of protecting and respecting nature and the environment. Can you Use a Tree Disc to Build a Resin Table? Loosen any screws on the mold and remove the parallel clamps. Dispense 1 part resin to 1 part hardener (by volume) into a clean mixing cup. Let us have a look at how you, Read More How to make Resin Rings Resin Rings DIY GuideContinue, Resin has taken off by storm over the last two years and should we really be surprised? We have selected two of the leading products in each category to help you choose the best epoxy for your river table. If you're applying the seal coat to bare wood (instead of a nautical chart, as shown here), the seal coat prevents air in the wood from off-gassing & creating bubbles in the flood coat. At this point, the first layer is not yet completely cured and still sticks. Let everything harden well and then remove the adhesive tape.

Once youve mixed the second container of epoxy, you will transfer it to a new container (I used plastic cups). Because these tables are very modern but at the same time also extremely noble and high-quality. Feel free to go in any direction. Thank you so much. However, please only torch as much as necessary or swing over it briefly with the heat gun, otherwise the resin could be damaged. on Step 8, Question
Determine the amount of TotalBoat TableTop hardener (Part B) by multiplying the gram weight of the resin x .83. Everyone reacts differently, so proper PPE is critical. If you want to do fancier things with your dirty pour, the you tuber Myriam's Nature has some great videos about this topic. As I said in the video, I ran into some mishaps, so I had to address that before moving on. I learned a ton. Let me know if you have any questions. If that looks good, then you are set.


Custom-designed coffee tables start at $1000, while dining river tables are pricier and start at $2500. Thus, it is very important to select a resin of premium quality so that you can ensure a perfect finish once the resin has cured. It also helps if youre on a leveled surface.

If you do not already have ink or pigments to color your resin, then we have a couple of our best suggestions below: Pour the first layer of crystal clear resin into the epoxy resin quickly but carefully, and then briefly apply the epoxy resin with a heat gun. Use the heat gun on its lowest setting to remove air bubbles. The epoxy used in the projects is a 1-to-1 mix. The use of a release agent is very important for later removal of the tabletop, as otherwise the resin would adhere to the MDF and the parts of the mold would be very difficult to remove from the resin table. Once your epoxy river table has been cast and cured, it is in your best interest to apply a final transparent coating to your tabletop as a protective layer. I started to look for these materials and especially suitable resin. I will show you exactly and in detail how this works and I will tell you some valuable professional tips. Alternatively, you can spray the mold with silicone spray or Teflon spray. If you do this on a kitchen counter, will it withstand heat? In the step-by-step instructions below I will show you step by step how to make your own Exopy River Table. Available for sale on Jamestown Distributors, TotalBoat Clear Epoxy Bar & Table Top Kit. It is highly recommended that you apply a sanitary silicone barrier to the wood along the edge of the river. Then you might also be interested in the following blog post: Epoxy Resin for Wood. And, when they turn the evil 13, look out! Note, however, that all devices or parts used to fasten the wood can come into contact with the resin. 1 quart of mixed epoxy = 57.75 cubic inches 2 quarts of mixed epoxy = 115.5 cubic inches 3 quarts of mixed epoxy = 173.25 cubic inches 1 gallon of mixed epoxy = 231 cubic inches.